20 Easy Things To Make Out of Paper for Your Next Family Art Session

There are few things more fun than crafting with family during the holidays. It keeps kids preoccupied and encourages them to express themselves creatively. You can use plenty of materials for arts and crafts, but the paper is a tried and true staple for any crafter.
You’ll find there are countless things to make out of paper. Paper crafting can be enjoyable for people of all ages. Many of these crafts don’t require any skill and are simple enough for kids and toddlers to create. Below, you can browse a list of 20 easy and fun paper crafts to make with your kids.
What Tools You Need To Make Cool Things With Paper

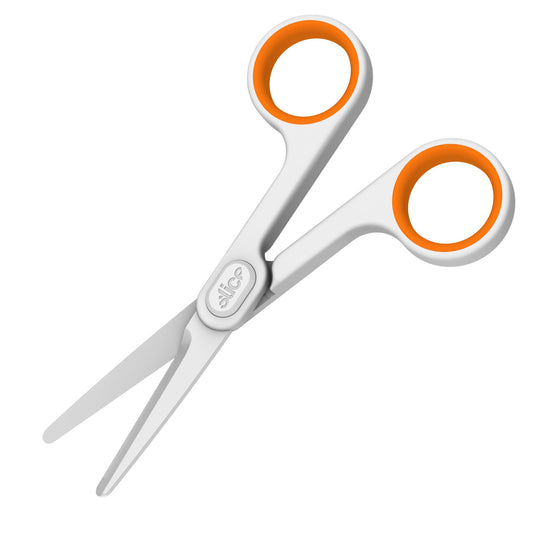
While some projects may vary regarding difficulty and what’s required, some tools are paper craft staples. For example, various cutters, glue, tape, and scissors are crafting must-haves. If you’re in the market for a high-quality pair of scissors, look no further than the Slice® Ceramic Scissors (Small). They’re easy to wield, lightweight, and perfectly safe for little fingers.
In addition, the blades are made of zirconium oxide, a sturdy ceramic that lasts longer than standard metal and is safe to the touch. It cuts through a variety of materials, including paper. The scissors’ soft-touch finger grips make cutting a comfortable, stress-free experience.
What Crafts Can You Make With Paper?
- Paper Ball Garland
- Flamingo Craft
- Paper Flowers
- Fruit Slice Bookmarks
- Paper Wreath
- 3D Paper Stars
- Toilet Roll Creatures
- Beaded Paper Butterflies
- Paper Chain Snake
- Paper Beads
- Chinese Lanterns
- 3D Picture Frame
- Hot Air Balloon
- Paper Butterflies
- Paper Ice Cream Banner
- Paper Pinwheels
- Rainbow Paper Chain Wall Hanging
- Napkin Holder
- Creative Collage
- Cake Topper Paper Chain
Paper Ball Garland

One of the things to do with paper is this craft, perfect for stepping up your holiday decorating game or adding fun flavor to your living room walls. For this project, you’ll need:
- Scissors
- Glue
- Multicolored paper
Step 1: Cut the paper into narrow strips. Bear in mind that the longer the strip, the bigger the ball.
Step 2: Crease the middle of your strips by lightly folding them in half.
Step 3: Glue two strips together to form a cross. Add a dab of glue as close to the center as possible. Then, add two more strips to the cross, creating an “x.”
Step 4: To get the ball shape as pictured above, fold the ends of each corresponding strip toward the center, adding glue on top to secure it. Make as many garland balls as you wish.
Step 5: Run a strand of yarn through the gaps in the garland balls and string them up for a festive display.
Flamingo Craft
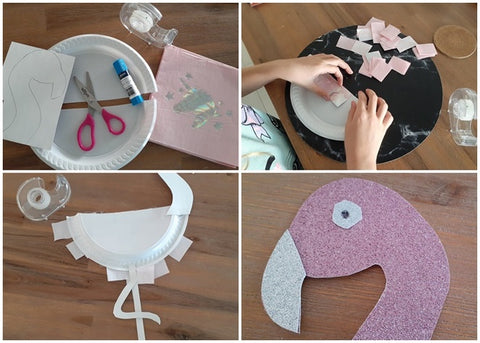
If your kid’s favorite animal is a flamingo, this papercraft is one of the things to make out of paper for them. Create a sparkling pink flamingo that your child can proudly display in their room. This project requires:
- Pink Napkins
- Half a paper plate
- Pink and silver glitter cardboard
- Scissors
- Glue
- Tape
Step 1: Cut out large squares from the napkins to cover your half plate. Position and tape them, so they resemble flamingo feathers.
Step 2: Cut a flamingo head shape from the pink glitter cardboard. Then, cut out the flamingo leg, beak, and eye from your silver glitter cardboard.
Step 3: Tape the head and leg on the top and bottom of the half plate, respectively. Glue the flamingo’s beak and eye on its head. Your kid now has a bona fide flamingo to decorate their space.
Paper Flowers

What flower craft to make with paper? Flowers make every room look sleek and stylish. They’re a timeless decorative staple. If you don’t want to purchase real flowers, why not add some that’ll never wilt? To make paper flowers, you’ll need:
- Scissors
- Craft Glue
- Pencil
- Flower Template
- Dowel (optional)
- Wonder Clips (optional)
Step 1: Download and print a flower template (here). Cut out all the pieces you’ll need to assemble the flowers.
Step 2: Overlap the flower petals by gluing them together. You can hold them together using wonder clips, too.
Step 3: Create layers of petals on the flower, gluing them on each other. Set a somewhat heavy object like a small bowl on top of them to help them dry in place. Continue adding layers until you’ve used up all the petals from the template. Lastly, glue a yellow circular piece to represent the pistil in the center. Marvel at your flowery creation.
Fruit Slice Bookmarks

Here’s a fun way to foster your kid’s love for reading while engaging their creativity. These fruit slice bookmarks will certainly find use among the little book lovers in your family. This paper craft requires:
- Craft Glue
- Pencil
- Scissors
- Multicolor Craft Paper
- Printable Template
Step 1: Fold a small square piece of paper in half diagonally. This creates two triangles.
Step 2: Follow that up by folding the top triangle of your folded piece in half. Fold the top corner of the top triangle in half, bringing it toward the bottom edge. This will create a pocket.
Step 3: Fold the triangle’s left corner, matching it with its top corner.
Step 4: Repeat this with the right corner.
Step 5: Next, fold in half your folded-up parts, placing them in the pocket created in Step 2.
Step 6: You’ll create an origami corner bookmark by similarly folding each side as pictured above.
Step 7: Print out your template and trace the patterns on your multicolored paper. Then, cut them out. For example, the watermelon would have black seeds (from black paper), pink paper for the center, and green for the rind. Attach the components of your watermelon to the white origami cutout. Lastly, read in style.
Paper Wreath

Another fun thing to do with paper?! This paper wreath isn’t just holiday-appropriate; you can hang it in your house year-round. Add a creative touch to your front door with this eye-catching design. For this project, you’ll need:
- Styrofoam Wreath
- Scissors
- Adhesive
- 3-4 sheets of Patterned Paper
- Trimmer
- Xyron Creative Station With Permanent Refill
Step 1: Cut your patterned paper into strips.
Step 2: Run several strips of patterned paper side by side through the Creative Station. Remember that the pattern you want displayed on the wreath should be facing up.
Step 3: Remove each strip from the machine and its backing before loosely looping them around the styrofoam wreath. Tip: press the ends together before sticking the rest of the strip to itself. Repeat until the strips cover the entire wreath.
Step 4: Cut a “V” at the top of each strip. This makes it look like a ribbon. Embellish it with any decorations or photos you want to make it uniquely yours.
3D Paper Stars

Here’s another thing to make with paper, a glitzy project that’ll glam up any celebratory occasion. You can make 3D stars with your little ones for a fun and easy arts and crafts session. You’ll need the following for this creation:
- Colored cardstock
- Colorful coated cardstock
- Cricut Scoring Wheel
- 3D Stars Template
Step 1: Access the 3D Star files in Cricut Design Space at the above link. Cricut Design Space will inform you what tool to use depending on the material at your disposal. For example, you might use a Single Scoring Wheel for regular cardstock. For coated cardstock, Design Space might select a Double Scoring Wheel.
Step 2: Insert the corresponding scoring wheel with your cardstock type. Then, the machine will cut out your stars.
Step 3: Fold your stars, and display them for a bit of sparkling magic.
Toilet Roll Creatures

Here’s another thing to make with paper. Allow your kids to get crafty with some fun toilet paper roll creatures. You can make everything from butterflies and ants to aliens and robots. The sky’s (and your imagination’s) the limit. For this, you’ll need:
- Toilet paper rolls
- Scissors
- Glue
Optional supplies:
- Googly eyes
- Tissue paper
- Multicolored construction paper
- Pipe cleaners
- Foil
- Pom pom balls
Step 1: Let your child’s imagination run wild. They can create whatever’s in the above collage of photos or construct an innovative new creature from the depths of their creative genius. Let them get creative with it!
Beaded Paper Butterflies

Add a touch of spring to your humble abode with these gorgeous beaded paper butterflies. These beauties will undoubtedly banish those winter blues. Have your kids join you for a magical arts and crafts session while you design these paper crafts. Here’s what you’ll need:
- Scissors
- Assorted beads
- Scrapbook paper
- Craft wire
- Optional: paper scorer
Step 1: Cut out butterfly wings from your scrapbook paper. You can trace the paper first before cutting. Perhaps even find a butterfly design online and use that as a template.
Step 2: Score one-inch parallel lines across your wings.
Step 3: Accordion fold the scores on your wings. Step 4: Pinch the middle of your wings and bind them with the craft wire. Leave some excess wire protruding. You’ll use that for your antennas. You can also add beads to your antennas if desired.
Paper Chain Snake

Who says snakes have to be scary? Now, you and your kiddos can create too-cute paper chain snakes that’ll make playtime 100 times better. This project will require:
- Construction paper
- Scissors
- Glue
- Felt tip markers
- Printable snake template – Head, eyes, tongue, tail, top, tummy, and sides
Step 1: Cut out the appropriate snake parts from the printable template. Create a paper chain, alternating the “top” and “tummy” components with the “side” pieces. When adding the top and tummy parts, make sure you place the glue on the underside. For the sides, the glue should be on the back.
Step 2: Time to color! Color in the tongue and eyes with your felt tip markers, gluing them on the head.
Step 3: Fold the tab on the head and do the same on the tail. Violà! You’ve got an adorable snake with which to play.
Paper Beads

Did you know you can make beads out of paper? It’s a surprisingly easy and fun project, and the beads can be used for various crafty creations. For this paper craft, you’ll need:
- Multicolored origami paper
- Scissors
- Glue
- Skewer sticks
Step 1: Cut out long isosceles triangles from the origami paper. Wrap them tightly around skewer sticks. Toward the end of the paper, add a dab of glue to create the bead.
Step 2: Get creative with it! You can add glitter to your beads, have your kids thread them to make necklaces and bracelets, or add safety pins to fasten them to jackets and backpacks.
Chinese Lanterns

You can create these vividly colorful lanterns to display at any time of year to brighten your space or bust them out during the holiday season. Either way, your kids will have fun creating these beauties. Your next paper craft obsession requires:
- Multicolored paper
- Scissors
- Tape
Step 1: Fold a piece of paper in half lengthways. Then, follow that up by cutting strips from the fold until you’re 2 centimeters from the end.
Step 2: Lay out the paper, making a tube by taping the two shorter edges together.
Step 3: When it’s time to make the handles for the lanterns, cut out a rectangle from your paper and tape it to the top of the lantern in a handle shape. Hang your lanterns and marvel at their beauty.
3D Picture Frame

Now, your child can help you frame your most precious memories with these adorable 3D picture frames. It’s a fun and easy project you can do with the whole family. For this project, you’ll need:
- Scissors
- Pencils
- Multicolored cardstock
- Picture frame template
Step 1: Print your picture frame template on your multicolored cardstock (you choose the colors).
Step 2: Cut out the square corners of your frame.
Step 3: Unleash the kiddos for decorating time. They can embellish their photo frames however they’d like. For example, they can add colorful designs with markers or colored pencils.
Step 4: Wrap each edge tightly around a pencil. Make sure you roll the sides so that the pattern is facing upward. Then, slide the pencil out. This gives your picture frame a “3D” look. Lastly, immortalize your memories in style.
Hot Air Balloon
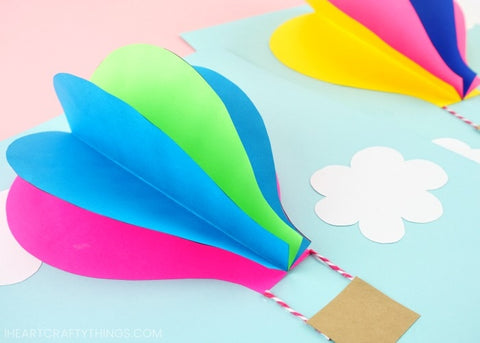
Your kids to take to the skies (in their minds)! Well, at least with these paper craft hot air balloons. It’s an easy, fun, and colorful way to spend quality family time together. This project requires the following:
- Scissors
- Glue stick
- 3D hot air balloon template
- White paper
- Tacky glue
- Baker’s twine
- Multicolored paper
- Tan cardstock
- Light blue cardstock
Step 1: Print out your hot air balloon template. You can do this directly on the multicolored paper of your choice or the white paper for tracing onto your multicolored paper. Cut out the 5 hot air balloons in the template.
Step 2: Cut out the square on the template. This will serve as the design for your balloon basket. Use it to trace said balloon basket on your tan cardstock paper. Set that aside for later.
Step 3: Fold each balloon in half along the dotted line at the template’s center.
Step 4: Glue one of your folded balloons onto your light blue cardstock. Then, glue another balloon on top of it. Continue doing this until every balloon (there should be 5) is glued together, creating a “3D” effect.
Step 5: Cut out white clouds from your white paper and glue them to your light blue cardstock.
Step 6: After gluing the top and bottom of your balloon to the light blue cardstock, cut out and glue pieces of the baker’s twine to the balloon bottom. These are the basket ropes.
Step 7: Glue on the brown basket, making it appear attached to the baker’s twine. Imagine you’re in that hot air balloon, soaring above the clouds!
Paper Butterflies

Nothing says “springtime” quite like butterflies. If you’ve got a hankering for warmer weather and for something to cure your winter blues, these paper craft butterflies will do the trick. For these beauties, you’ll need:
- Pink cardstock (2 different shades)
- Purple cardstock (2 different shades)
- Pink glitter paper
- Purple glitter paper
- Extra large white cardstock
- Printable butterfly templates (this site has 3 different sizes)
Step 1: Print off all 3 templates (you’ll want different sizes to convey the intended effect). Cut out your butterflies using each color of paper as listed above.
Step 2: Score two lines in the middle of each butterfly. This should outline a rectangle in the center. That’ll be where you glue your butterflies to the cardstock. However, if you want to display your butterflies on the wall, you can apply adhesive putty to the middle section of your butterflies.
Step 3: Glue your butterflies to the cardstock. Position them in descending order from size, starting with the larger ones at the top and the smaller ones at the bottom. Mix in a few glitter butterflies as well.
Paper Ice Cream Banner

If you and your kiddos dream of eating deliciously cold ice cream cones to beat the summer heat, you can live vicariously through this paper ice cream banner. This arts and crafts staple will require:
- Multicolored patterned cardstock for your ice cream (preferably pastel colors)
- Foam tape
- Hot glue
- Hole punch
- Scoring board
- Pink yarn
- Scissors
- Tan/brown paper for your cone and cherry stems
- Printable ice cream cone template
Step 1: Print out your template and cut out the ice cream cones on your tan/brown paper.
Step 2: Create a paper rosette for each cone. These will represent your ice cream scoops. Cut 1.5 by 11-inch strips from your patterned cardstock. Whip out your scoring board, and score said strips at every ¼ inch. Accordion fold the strips and glue the ends together to form a loop.
Step 3: Next, cut a small square of paper and hot glue it in the center of the loop. Push it down so that the rosette’s center comes in contact with the hot glue. Hold it in place while the glue dries. Add a matching circle of patterned paper to the top of each rosette.
Step 4: Hot glue the rosettes to the cones. Then, add cherries to the tops of the ice cream scoops.
Step 5: Now, it’s time to turn your ice cream cones into a bona fide banner. Cut a circle from your cardstock and punch two holes in it. Use foam tape to fix it to the back of the ice cream cones. String the yarn through the two holes.
Hang it up for a fun birthday party or for a splash of summer magic.
Paper Pinwheels

These paper pinwheels are perfect for 4th of July celebrations and any festive, summery shindig requiring an extra pop of pizzazz. You’ll need the following supplies for this paper craft:
- Hot glue gun
- Wooden dowels
- Small brads
- Red, white, and blue paper (metallic paper gives these pinwheels a nice sheen)
- A cutting machine like the Cricut Explore
Step 1: Cut out each pinwheel using the template here.
Step 2: Bring the holes along the outside edges – one on each side – toward the center. Then, you’ll thread 1 brad through all 5 holes and open the clasp. This ensures the pinwheel remains in one piece.
Step 3: Glue a wooden dowel on the back of each paper pinwheel.
Now, you have decorative pinwheels that’ll surely be the life of the party!
Rainbow Paper Chain Wall Hanging

This project will spruce up any bedroom. Instead of purchasing expensive artwork, why not embellish your walls with your child’s colorful creation? This paper craft might even intrigue the teen in your life. This craft needs:
- Rainbow template (find it here)
- Scissors
- Dowel
- String
- Multicolored cardstock (tan, light pink, coral, and mustard yellow)
Step 1: Map out your design. The rainbow template shared at the above site boasts squares representing 2 links each. If you’d like to make a smaller display, use only 1 link per square.
Step 2: Cut out strips for your rainbow from your multicolored cardstock. Use the photo above as an example. You can cut each strip around 6 by 1 inch wide.
Step 3: Now, it’s time to make your chains. Create a loop and hot glue the ends to forge a ring. Then, loop each strip together, as shown above. Use the template for reference.
Step 4: After creating your rows of rainbow chains, slide the tops onto a dowel. Attach a piece of sturdy string to your dowel and hang it up for all to see.
Napkin Holder

Making things out of paper has never been so fun. Instead of shelling out more money than necessary for napkin holders at the store, why not make some at home? You can even get your little ones involved in a fun arts and crafts session. For this project, you’ll need:
- Multicolored construction paper (at least two different colors as pictured above)
- Scissors
- Glue stick
- Toilet paper roll
- Tape
Step 1: Cut out a rectangular shape from your colored construction paper. The color you choose is up to you. Make sure it can fit around a toilet paper roll. Fold your paper lengthwise and cut slits from the fold (around 5-6) until you’re 2 centimeters from the end.
Step 2: Cut strips of colored construction paper (in a different color than the one used in Step 1). Make sure they’re the same width as the slits in the first paper. Next, thread your strips through the slits, weaving them like a basket.
Step 3: Glue the ends together after you’ve finished weaving your papers. Lastly, wrap it around the toilet paper roll, securing it with tape. You’re ready for dinner!
Creative Collage

Sometimes, it’s best to give your kids free time to create off-the-cuff artwork instead of constantly structured arts and crafts sessions. Let their little minds run wild. This could be a creative collage with excess paper or leftover supplies from another project. For example, they can create the above paper plate jellyfish. They’ll need the following:
- Paper plate
- Strings of beads
- Scissors
- Scraps of construction paper
- Glue
Step 1: Take half of a paper plate and glue your scraps of paper to it. Then, cut out circles for your jellyfish’s eyes and adhere them to said plate.
Step 2: Get creative. You can add strings of beads and ribbon as the jellyfish’s tentacles.
Cake Topper Paper Chain

Here’s a fun decoration to adorn your child’s birthday cake. They can add their own touches to it as well. Their cake will look so picture-perfect your friends will wonder if you’re moonlighting as a pastry chef. This project requires:
- Scissors
- Construction paper
- 2 bamboo skewers
- Craft glue
- Tweezers
- Ruler
- 2 mini clothespins
Step 1: Cut 1 by ¼ inch strips of multicolored paper. Apply a dab of glue to the end of one of your strips, loop it with the tweezers, and hold it together for 6 seconds until it’s dry.
Step 2: Repeat the process in Step 1 by alternating colors with different colored construction paper strips. Keep going until your chain is at 16 inches.
Step 3: Create a smaller chain in this manner – 13 inches should do the trick.
Step 4: Cut your two bamboo skewers to 9 inches each.
Step 5: Cut three small different-colored rectangles at the following sizes: 1 by 3 inches, 1 by ¾ inches, and 1 by ¼ inches. Add fringe to each rectangle with your scissors.
Step 6: Add a dab of glue to the bottom of the largest rectangle and wrap it around the top of the skewer with the fringe protruding. Repeat the process in descending size. Then, repeat steps 5-6 with the other skewer.
Step 7: Lay everything out, including the paper chains and bamboo skewers. Position the smaller chain on top of the larger one. Let the chains hang loosely, with the skewers about 8 inches apart. Use your mini clothespins to secure the chains under the fringe tassel on each skewer. Get ready to admire a cake that looks too good to eat.
-
Tijeras de cerámica (pequeñas)
Precio habitual $41.79 USDPrecio habitualPrecio unitario por